You’ve seen gorgeous, intricate henna designs and thought, ‘I could never do that.’ Well, I’m here to tell you that you can. This guide is specifically for creating inai simple cantik—stunningly simple and beautiful henna art, no artistic skill required. We’ll break down everything from choosing the right henna to applying five easy designs and making them last.
The goal is to bridge the gap between admiring henna and confidently creating it yourself. By the end of this article, you’ll have the tools and confidence to create your first beautiful henna design.
First Things First: What Is Natural Henna and Why It Matters
Let’s start with the basics. Henna, or inai, is a plant-based dye made from the Lawsonia inermis plant. It temporarily stains the skin, making it a popular choice for body art.
The process is pretty simple. The leaves are dried, crushed into a powder, and then mixed into a paste for application. This paste is what you apply to your skin to create beautiful designs.
Now, here’s where it gets important, and not all henna is created equal. There’s a big difference between natural henna and something called ‘black henna’.
Natural henna has a few key characteristics. It smells earthy, and the paste is greenish-brown. When applied, it stains the skin in shades of orange, red, and brown.
It’s safe and has been used for centuries.
On the other hand, ‘black henna’ can be dangerous. It often contains a chemical dye called PPD, which can cause severe skin reactions, chemical burns, and even permanent scarring. Stay away from anything labeled as ‘black henna’.
So, what should you do, and always choose natural henna. Look for products that list Lawsonia inermis as the main ingredient.
If you’re getting a henna tattoo, ask the artist about the ingredients. Trust me, it’s worth the extra effort.
Here’s a quick comparison to help you out:
| Type | Characteristics | Safety |
|---|---|---|
| Natural Henna (inai) | Earthy smell, greenish-brown paste, stains orange, red, and brown | Safe |
| Black Henna | Often contains PPD, can cause severe skin reactions | Dangerous |
Remember, when it comes to henna, natural is the way to go. Choose inai simple cantik for a safe and beautiful experience.
Gather Your Tools: The Beginner’s Henna Starter Kit
When I first started with henna, I was overwhelmed by all the supplies. But it doesn’t have to be that way. Here’s a simple list to get you started.
-
High-Quality Natural Henna Cones. One of my friends told me, “Pre-made cones are a lifesaver for beginners.” Look for ones with natural ingredients and a recent creation date. They make the process so much easier.
-
A Practice Sheet. Print design templates on paper to practice your pressure and line control. Trust me, this step is crucial before you start applying henna to skin.
It helps you get a feel for the flow and consistency.
-
Lemon Sugar Sealant Spray (optional but recommended), and this one is inai simple cantik. It keeps the paste moist and stuck to the skin, which can help you achieve a darker stain.
A little goes a long way, and it’s worth the extra step.
-
Natural Oil. After you’ve applied your henna, use coconut or olive oil for aftercare. It helps protect the design and keeps your skin moisturized.
Simple, yet effective.
With these essentials, you’ll be well on your way to creating beautiful henna designs.
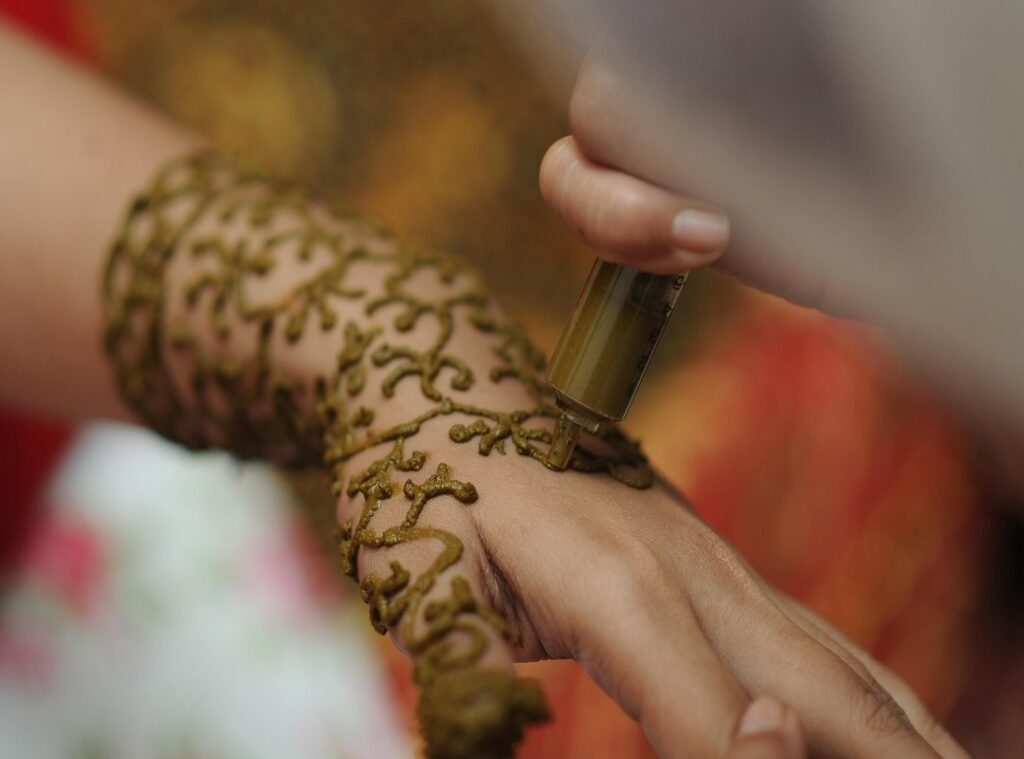
From Cone to Skin: A Step-by-Step Guide to Basic Application

Let’s get started. First things first, you need to prep your skin. Wash the area with soap and water.
Make sure it’s free of oils or lotions. This is crucial for a clean application.
Next up, holding the cone. Think of it like a pen or piping bag. Grip it near the top for better control. Fhthopefood
It’s all about how you hold it, really.
Now, snip the very tip of the cone. Do a test squeeze on a paper towel. You want a consistent flow.
Not too thick, not too thin, and perfect, right?
Time to master the basics, and start with simple shapes. Dots, straight lines, curved vines, and simple leaf shapes.
These are the building blocks of any design. Practice makes perfect.
When you’re ready, apply gentle, steady pressure. Hold the cone tip slightly above the skin. Don’t drag it.
This way, you avoid smudging and get cleaner lines.
Finally, let it dry. The henna paste needs at least 30-60 minutes to set. No moving, no touching.
Patience is key here, and trust me, it’s worth the wait.
Remember, inai simple cantik is all about keeping it straightforward and beautiful. No need to overcomplicate things. Just follow these steps, and you’ll be on your way to creating stunning designs.
Inspiration Gallery: 5 Stunning Designs for Hands and Fingers
Welcome to your go-to lookbook for some of the most achievable and stylish designs. Each one is simple yet elegant, perfect for those who want a touch of inai simple cantik.
The Minimalist Finger Band
A simple line or series of dots wrapping around one finger like a ring. This design is all about subtlety. Just grab a fine-tipped pen and draw a clean, straight line or a row of evenly spaced dots.
Easy and chic.
The Delicate Wrist Vine
A single, curved line extending from the wrist with small leaves branching off. Start at the wrist and draw a gentle curve. Add tiny leaves along the line.
It’s a delicate and natural look that feels fresh and airy.
The Simple Center Mandala
A central dot on the back of the hand with a circle of smaller dots or petal shapes around it. Place a dot in the center and surround it with a ring of smaller dots or petal shapes. It’s a classic mandala design that’s both calming and beautiful.
The Cascading Dots
A trail of dots of decreasing size running down the length of the middle finger, from the nail to the knuckle. Begin with a larger dot at the tip of your nail and gradually make them smaller as you move down. It’s a playful and eye-catching design.
The Single Flower
A simple five-petal flower on the back of the hand, using teardrop shapes for petals and a dot for the center. Draw a small dot for the center and add five teardrop-shaped petals around it. It’s a timeless and charming design that never goes out of style.
These designs are not just pretty; they’re also easy to create. Give them a try and see which one speaks to you.
Making It Last: Pro Tips for a Dark, Long-Lasting Stain
Now that you’ve created a beautiful design, you want it to look its best and last as long as possible. Leave the paste on for at least 4-6 hours (or overnight). Gently scrape (don’t wash) the dried paste off.
Avoid water for the first 12-24 hours.
The initial stain will be bright orange. Over the next 48 hours, it will darken to a rich reddish-brown.
inai simple cantik can be a great choice for a stunning yet manageable design. Grab a cone and start your creative henna journey today.
 Virginia Rossintall is the kind of writer who genuinely cannot publish something without checking it twice. Maybe three times. They came to food culture and trends through years of hands-on work rather than theory, which means the things they writes about — Food Culture and Trends, Meal Planning and Preparation, Recipe Ideas and Cooking Techniques, among other areas — are things they has actually tested, questioned, and revised opinions on more than once.
That shows in the work. Virginia's pieces tend to go a level deeper than most. Not in a way that becomes unreadable, but in a way that makes you realize you'd been missing something important. They has a habit of finding the detail that everybody else glosses over and making it the center of the story — which sounds simple, but takes a rare combination of curiosity and patience to pull off consistently. The writing never feels rushed. It feels like someone who sat with the subject long enough to actually understand it.
Outside of specific topics, what Virginia cares about most is whether the reader walks away with something useful. Not impressed. Not entertained. Useful. That's a harder bar to clear than it sounds, and they clears it more often than not — which is why readers tend to remember Virginia's articles long after they've forgotten the headline.
Virginia Rossintall is the kind of writer who genuinely cannot publish something without checking it twice. Maybe three times. They came to food culture and trends through years of hands-on work rather than theory, which means the things they writes about — Food Culture and Trends, Meal Planning and Preparation, Recipe Ideas and Cooking Techniques, among other areas — are things they has actually tested, questioned, and revised opinions on more than once.
That shows in the work. Virginia's pieces tend to go a level deeper than most. Not in a way that becomes unreadable, but in a way that makes you realize you'd been missing something important. They has a habit of finding the detail that everybody else glosses over and making it the center of the story — which sounds simple, but takes a rare combination of curiosity and patience to pull off consistently. The writing never feels rushed. It feels like someone who sat with the subject long enough to actually understand it.
Outside of specific topics, what Virginia cares about most is whether the reader walks away with something useful. Not impressed. Not entertained. Useful. That's a harder bar to clear than it sounds, and they clears it more often than not — which is why readers tend to remember Virginia's articles long after they've forgotten the headline.